

Windowsill Herb Garden Kit: Grow Fresh Herbs Indoors Easily
Imagine the wonderful smell and taste of fresh herbs right from your own home! Think about snipping some basil for your pasta or mint for your tea – so easy and delicious.
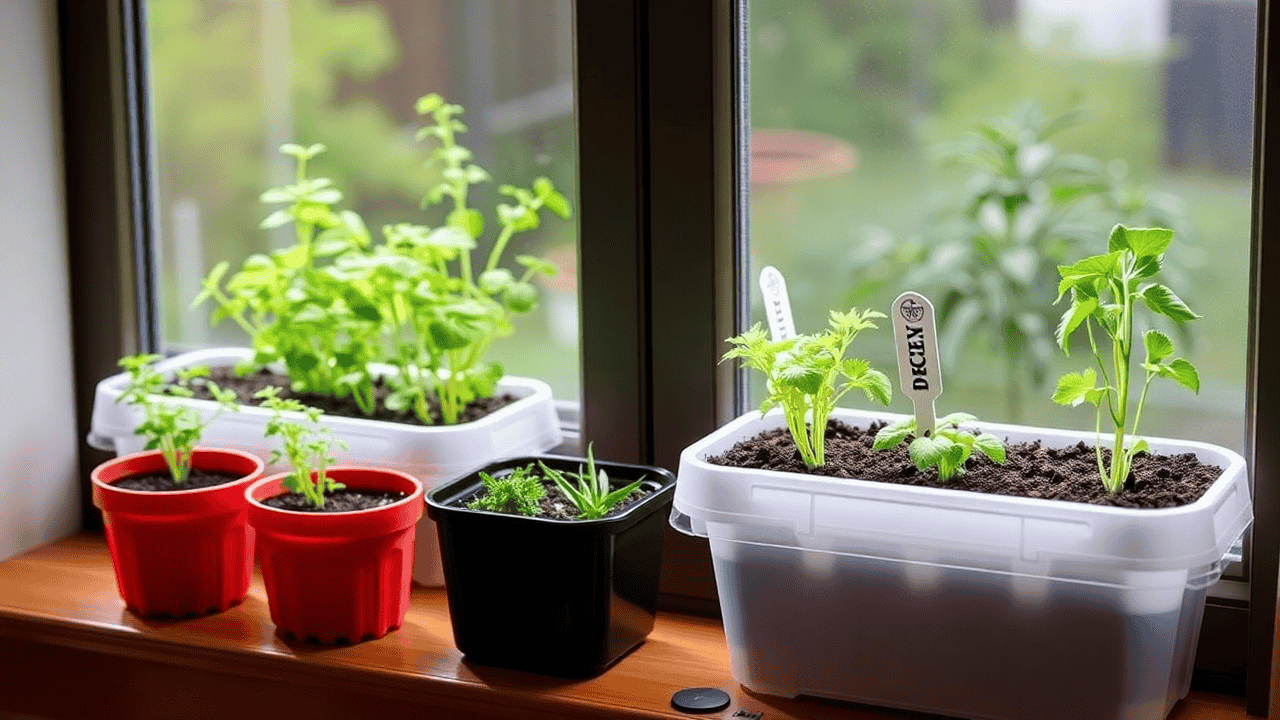
This post is all about the convenience of an indoor herb garden kit. These kits are like mini-gardens you can keep inside, bringing a natural touch to your space. They usually come with everything you need to start growing your own flavorful herbs, like small containers, soil or a unique growing mix, and seeds. You don’t need to be a gardening expert to use a windowsill herb garden kit – they’re made for everyone! We’ll take a closer look at these fantastic windowsill herb garden kits and how they can bring the joy of fresh, natural herbs right to your fingertips!
Deconstructing the Kit Components
Growing your herbs indoors has many advantages. They don’t take up much space, you always have fresh herbs when you need them, and they don’t need a lot of care. Plus, it’s a fun and easy way to bring a bit of nature inside, and it’s better for the environment than buying pre-cut herbs.
Let’s break down what’s in your herb garden kit and why each part is important for growing happy herbs on your windowsill.
Seeds
Seeds are the reproductive units of flowering plants, capable of developing into new plants under the right conditions. They contain an embryonic plant, stored nutrients, and a protective outer coat. In simpler terms, seeds are like nature’s tiny packages, holding everything needed to grow a new plant. Seeds are like tiny baby plants, ready to grow with the right care.
Choosing high-quality seeds is important because they have a better chance of sprouting and developing into healthy plants. Non-GMO seeds ensure they haven’t been modified in a laboratory. It’s also essential to pick seeds that are suitable for indoor growth, as some plants require more space than a small windowsill can provide. Seed viability refers to how alive and capable of growth the seeds are. To maintain this, store seeds in a cool, dry place until it’s time to plant them. Simple steps like these can make a big difference in your gardening success.
Containers
Containers are vital for your herbs as they provide a secure space for growth and nourishment. Selecting the right container is key to ensuring success. The size of the container should be sufficient for roots to spread and develop, as overcrowded roots can lead to unhealthy plants. The material of the container also matters—terracotta pots promote breathability by allowing air and water to flow, while plastic pots are ideal for retaining moisture, which is beneficial for plants needing steady hydration. Most importantly, proper drainage is essential. Every container must have holes at the bottom to prevent water buildup, which could lead to root rot and harm your herbs. Thoughtful choice of containers will support your plants’ health and growth. Let me know if you’d like help with container recommendations!
Soil or Growing Medium
Soil or growing medium serves as the foundation for your plant’s roots, allowing them to grow and absorb vital nutrients for healthy development. Indoor potting mix is an ideal choice for potted plants as it provides excellent drainage, essential nutrients, and is sterile, ensuring protection against diseases. On the other hand, regular garden soil is often too heavy, poorly drained, and may contain pests or harmful pathogens, making it unsuitable for indoor gardening. Another great option is coco coir, made from coconut husks, which excels at retaining water while maintaining airflow around the roots. Often mixed with nutrient-rich components, coco coir offers a balanced alternative for indoor plant growth. Selecting the right soil or growing medium is a crucial step in fostering thriving plants.
Instructions
Instructions provide detailed guidance on how to assemble your gardening kit and take care of your seeds effectively. While following these steps is crucial, it’s equally important to understand the reasoning behind them. For example, instructions may tell you to water your seeds a specific way or to place your pot in a sunny spot. Knowing why these steps matter—like ensuring the seeds receive enough moisture or light for germination—can help you care for your plants more intuitively and adjust as needed for their growth. Clear instructions pave the way for successful planting and thriving herbs!
Optional Kit Components – Helping Your Herbs Grow Better
Self-Watering Systems
Self-watering systems are specialized pots with a built-in water reservoir at the bottom. They allow plants to absorb water as needed, making them a convenient option for busy gardeners or those new to plant care.
Pros: These systems help regulate watering, reducing the risk of giving plants too much or too little water. They can be particularly useful for herbs and other indoor plants that need consistent moisture.
Cons: Without proper monitoring, the roots can still become overly wet, which may lead to rot or other issues. It’s important to check the reservoir and adjust as needed to maintain a healthy balance.
Overall, self-watering pots can be a great tool when used thoughtfully! Let me know if you’d like recommendations or tips on using them effectively.
Grow Lights
Grow lights are specialized lamps designed to provide light that supports plant growth when natural sunlight is insufficient.
Plants require specific types of light, known as the light spectrum, to grow effectively. Measurements such as PAR (Photosynthetically Active Radiation) and PPFD (Photosynthetic Photon Flux Density) help determine the quality and intensity of light that plants can use.
Common grow light options include LED and fluorescent lights. LEDs are energy-efficient and long-lasting, while fluorescent lights are widely accessible and effective. If your windowsill receives less than 4-6 hours of direct sunlight daily, using a grow light can ensure your plants get the light they need to thrive indoors.
Plant Markers
Plant markers are small labels that you insert into the soil to identify what you’ve planted in each pot. Though simple, they are incredibly useful for keeping your garden organized, especially when growing multiple types of plants. These markers can save time and prevent confusion, ensuring you always know what’s growing where. A small detail, but one that makes a big difference!
Choosing the Best Herbs for Your Indoor Garden
When growing herbs indoors, there are a few important factors to remember. Certain herbs require very bright light, which a standard windowsill might not provide—consider using grow lights for these. Next, think about how the herbs grow—whether they stay compact or spread out—this will guide your choice of pot size and placement.
Humidity is another factor; certain herbs prefer moist air, while others do better in drier environments. Finally, consider how you’ll use the herbs, particularly if you’re growing them for cooking. Focus on the flavors you enjoy to make the most of your indoor herb garden. With these factors in mind, you can create a thriving and functional herb-growing setup!
Basil
Basil is a versatile herb with varieties like sweet basil and Thai basil, each having unique requirements for care. Sweet basil generally thrives in full sunlight, while Thai basil may tolerate partial shade. Both need consistent watering, but avoid overwatering to prevent root rot.
Keep an eye out for common issues such as yellowing leaves, which may indicate insufficient nutrients or overwatering, and pests like aphids. Address these problems promptly by adjusting watering schedules, feeding with appropriate fertilizers, or using natural pest control methods.
Cilantro
Cilantro is a flavorful herb but can be a bit tricky to grow, as it tends to bolt—or go to seed—fairly quickly. To keep it growing longer, try harvesting the leaves frequently to encourage continued growth. Ensure the plant stays cool by avoiding high temperatures, which often trigger bolting.
Cilantro thrives in partial sunlight, so a spot with filtered light or morning sun is ideal. Additionally, it prefers cooler conditions, so maintaining a temperature range of 15–25°C (59–77°F) will help extend its lifespan and productivity. Proper care can keep your cilantro growing and producing delicious leaves for a longer time!
Mint
Mint is a fast-growing herb that can quickly spread and take over if not contained. To manage its growth, it’s best to keep mint in its pot rather than planting it alongside other herbs.
There are various types of mint, such as peppermint and spearmint, each with unique flavors and uses. Peppermint has a stronger, cooling taste and is often used in teas and desserts, while spearmint offers a milder flavor, making it perfect for savory dishes and drinks like mojitos. By understanding the growth habits and uses of mint, you can enjoy its versatility while keeping it under control!
Thyme
Thyme is a hardy herb that thrives with minimal watering and prefers well-draining soil to keep its roots healthy. It’s an excellent choice for gardeners seeking a low-maintenance plant. There are various types of thyme, each offering unique flavors—some are more earthy and mild, while others have a sharper or lemony taste. Understanding the specific characteristics of the thyme variety you’re growing can help you make the most of its culinary or decorative potential.
Parsley
Parsley is a versatile herb with two main varieties—flat-leaf and curly—each having slightly different requirements. Flat-leaf parsley is often favored for its bold flavor and grows well in sunny spots, while curly parsley, with its milder taste, can tolerate slightly less direct sunlight. Both types need consistent moisture, but care should be taken not to overwater.
Parsley is a biennial plant, meaning it has a two-year life cycle. In its first year, it produces flavorful leaves, and in its second year, it typically flowers and goes to seed. Understanding its growth patterns can help you make the most of this herb over time.
Chives
Chives are one of the easiest herbs to grow, making them a great choice for beginners or busy gardeners. They thrive with plenty of light, so placing them in a sunny spot is ideal. Chives also appreciate consistent watering, but be mindful not to overwater, as they prefer well-draining soil. Versatile and flavorful, chives can enhance a wide variety of dishes, from soups and salads to omelets and potatoes. With minimal effort, you can enjoy this hardy herb year-round! Let me know if you’d like tips for harvesting or using chives.
Oregano
Oregano is another excellent herb choice, known for its strong, warm flavor that enhances a variety of dishes. Like thyme, oregano thrives in sunny locations and prefers well-draining soil to keep its roots healthy. Its hardy nature makes it a great option for indoor herb gardens, provided it receives enough light and proper care. With its aromatic and flavorful leaves, oregano can elevate your culinary creations while being relatively easy to grow! Let me know if you’d like tips on maintaining your oregano plant.
Rosemary
Rosemary is a wonderful addition to any herb garden, known for its piney aroma and bold flavor. It thrives in plenty of sunlight, so be sure to place it in a spot that gets abundant natural light. Rosemary is drought-tolerant and doesn’t like excessive water; ensure the soil drains well to avoid root rot. With proper care, this hardy herb can add both fragrance and flavor to your space. Let me know if you’d like tips on harvesting or using rosemary!
Dill
Dill is a fantastic herb option, loved for its feathery leaves and distinct, slightly tangy flavor. It thrives in plenty of sunlight, so ensure it has access to bright, direct light for optimal growth. Dill also prefers well-drained soil to keep its roots healthy and avoid waterlogging. With proper care, you can enjoy its flavorful leaves and seeds in a variety of dishes, from salads to pickles. Let me know if you’d like tips on harvesting or using dill!
If you’re a beginner, start with basil, mint, and chives, as they are generally easy to care for indoors. If you’re aiming for a specific cuisine, like Italian, focus on basil, oregano, and parsley to ensure you always have the key flavors on hand. Thoughtful planning makes all the difference in creating a thriving indoor herb garden!
Setting Up Your Windowsill Herb Garden
To make your windowsill herb garden thrive, consider these factors:
Choosing the Ideal Location
Sunlight:
Spend some time observing how many hours of direct sunlight your window gets during the day and note its direction. South-facing windows typically receive the most sunlight, making them ideal for herbs requiring full sun. East and west-facing windows offer moderate light, while north-facing ones receive the least.
Herbs that need full sun (6–8 hours daily)—such as basil, oregano, rosemary, thyme, dill, and sage—thrive in bright, sunny spots, with south-facing windows being the best option. For herbs that require partial sun (4–6 hours daily)—like cilantro, mint, parsley, and chives—east or west-facing windows work well, and some shade during the hottest part of the day may even benefit them.
If natural light is insufficient, consider using grow lights to provide the light levels your herbs need to thrive. Thoughtful planning ensures your indoor herb garden will flourish!
Supplementing Light:
Supplementing light is essential for indoor herbs if natural sunlight is insufficient. Grow lights come in different types, each with its pros and cons:
- LED (Light Emitting Diodes): Highly energy-efficient, they produce minimal heat and offer full-spectrum options perfect for plant growth. Available as panels, strips, or bulbs, they are versatile and effective.
- Fluorescent lights: A cost-effective choice initially, these generate less heat than incandescent options but are less energy-efficient than LEDs. Full-spectrum fluorescent bulbs work well for herbs.
- Incandescent lights: Generally not suitable for plant growth due to excessive heat and a limited yellow and red spectrum that doesn’t benefit leafy herbs.
The placement of grow lights is crucial. LEDs can be positioned closer to plants, usually 6–12 inches away, while fluorescents also require a similar distance. Always refer to the manufacturer’s guidelines for the best results. Ensure lights are neither too close, which could cause burns, nor too far, as this would reduce their effectiveness.
Most herbs thrive with 12–16 hours of light daily, combining natural and supplemental sources. Using a timer to automate the light cycles helps maintain consistency, while allowing 8 hours of darkness supports essential plant processes. Proper lighting ensures strong, healthy growth indoors!
Temperature and Air Circulation:
Maintaining the right temperature and ensuring proper air circulation are essential for a healthy indoor herb garden. Most herbs thrive in temperatures between 65–75°F (18–24°C), aligning with typical indoor comfort. Basil, however, prefers slightly warmer conditions around 75°F (24°C). Be mindful to avoid placing herbs near drafty windows or heating and cooling vents, as sudden temperature changes can stress the plants.
Air circulation is equally important for preventing fungal diseases like powdery mildew. Stagnant air traps moisture on the leaves, creating ideal conditions for fungi. Gentle airflow also strengthens stems and helps regulate temperature. You can improve airflow by slightly opening a nearby window when the weather allows, using a small oscillating fan set to low (pointing generally in the plants’ direction without prolonged direct exposure), and ensuring enough spacing between plants to let air move freely.
Planting
Preparing the Containers:
Preparing containers for your indoor herb garden involves selecting pots that allow for proper root growth and drainage. Choose pots that are at least 6 inches deep for most herbs, but opt for deeper pots (8–12 inches) for herbs with long taproots, such as cilantro and dill. Ensuring each pot has drainage holes at the bottom is vital to prevent water from accumulating and causing root rot, a common issue in indoor gardening.
While some gardeners place a layer of gravel or broken pot shards at the bottom of the pot to aid drainage, modern advice suggests this step is often unnecessary if you use a high-quality potting mix and ensure the pots have proper drainage holes. Ultimately, the drainage holes themselves are the most critical factor for maintaining healthy plants.
Filling with the Appropriate Growing Medium:
Filling your containers with the right growing medium is essential for the success of your indoor herb garden. Use a high-quality potting mix specifically formulated for containers or indoor plants, as garden soil is too dense, poorly drains, and may carry pests or diseases. Potting mixes usually contain a blend of peat moss or coconut coir for moisture retention, perlite or vermiculite for aeration and drainage, and sometimes compost or other nutrients to provide a balanced growing environment.
For herbs that thrive in drier conditions, like rosemary and thyme, you can enhance the potting mix with extra perlite or sand to improve drainage further. On the other hand, moisture-loving herbs such as mint and chives benefit from a mix containing more peat moss or coconut coir.
Sowing Seeds vs. Transplanting Seedlings:
When starting your indoor herb garden, you can either sow seeds directly or transplant seedlings, each requiring specific steps for success.
Sowing Seeds: Always follow the instructions on the seed packet, as different herbs have unique requirements. Generally, smaller seeds should be sown shallowly (1/8 to 1/4 inch deep), while larger seeds can be planted a bit deeper (about twice their thickness). Space seeds based on the mature size of the plant to prevent overcrowding. Sow a few seeds per pot or cell and thin out weaker seedlings later, leaving the strongest one. After planting, gently water the soil to avoid displacing seeds—use a spray bottle or place the pot in a shallow dish of water to moisten the soil from the bottom. Cover the pot with a clear plastic bag or propagation dome to retain humidity, and keep it in a warm spot with indirect light until germination.
Transplanting Seedlings: Begin with healthy seedlings that have a few true leaves (not just seed leaves). Carefully remove the seedling from its original container, loosening the roots gently if needed. Create a hole in the new potting mix deep enough to accommodate the seedling’s root ball, and position the seedling so the top of the root ball is level with the surrounding soil. Fill in the hole with potting mix, firming it lightly around the base of the plant. Water the plant thoroughly after transplanting to help it settle into its new home.
Initial Watering Techniques:
After planting seeds or transplanting seedlings, water thoroughly and gently until you see water draining from the pot’s drainage holes—this helps settle the soil around the roots. During the first week or two, maintain consistent moisture without waterlogging the soil. You can check by inserting your finger about an inch deep; if it feels dry, it’s time to water.
To minimize the risk of fungal diseases, avoid watering overhead, which wets the leaves. Instead, water at the base of the plants, targeting the soil. Using a watering can with a gentle rose head or watering from the bottom by placing the pot in a shallow dish of water is particularly effective for gentle and even moisture distribution.
Nurturing Your Indoor Herb Garden
Once your windowsill herb garden is set up, consistent care is key to a thriving and flavorful harvest.
Watering Techniques (with scientific rationale)
Watering herbs effectively requires adhering to the “moist but not soggy” principle to ensure roots receive both water and oxygen, crucial for their growth and vitality.
Scientific Rationale:
- Water’s Role: It transports essential nutrients to the roots.
- Oxygen’s Role: Needed for cellular respiration, a process that generates energy for growth.
The Risks of Overwatering:
- Root Rot: Waterlogged soil deprives roots of oxygen, causing them to suffocate and die. This creates an environment conducive to anaerobic bacteria and fungi, which further harm the roots. Despite wet soil, plants with root rot wilt because their damaged roots can no longer absorb water and nutrients.
- Oxygen Deficiency: Even without rot, soggy soil reduces oxygen access, leading to nutrient absorption issues, stunted growth, and yellowing leaves.
Monitoring Soil Moisture:
- Finger Test: Insert your finger 1–2 inches into the soil; water only if dry at this depth.
- Visual Cues: Dry soil often looks lighter; wilted leaves may signal dryness (though overwatering can also cause wilting).
- Pot Weight: Learn to distinguish the weight of a well-watered pot from a dry one.
Adjusting Watering Frequency:
- Herbs’ Needs: Mediterranean herbs like rosemary and thyme prefer slightly dry soil, while basil and mint thrive in consistently moist conditions.
- Environmental Factors:
- Light: Brighter light increases water loss.
- Temperature: Warmer conditions accelerate evaporation.
- Humidity: In humid settings, water evaporates slowly, reducing watering needs.
- Airflow: Good circulation prevents excessive soil moisture.
- Season: Active growth periods (spring/summer) require more frequent watering.
- Pot Size & Material: Smaller pots dry out faster; terracotta pots allow more evaporation compared to plastic or ceramic.
Proper Watering Technique: Always water thoroughly until excess drains out of the pot’s drainage holes—this ensures the entire root system is hydrated. Avoid shallow watering, which encourages surface-root development rather than deeper, healthier roots.
Fertilizing Your Herbs (understanding plant nutrition)
Fertilizing your herbs ensures they receive the nutrients they need to grow strong, healthy, and flavorful. While potting mix provides initial nutrients, these diminish over time, requiring supplementation.
Essential Nutrients:
- Nitrogen (N): Fuels leafy growth and gives herbs their vibrant green color.
- Phosphorus (P): Supports root development, flowering, and seed production, though it’s less critical for culinary herbs grown for leaves.
- Potassium (K): Boosts plant vigor, disease resistance, and flavor development.
- Micronutrients: Calcium, magnesium, iron, and zinc are also vital for overall plant health in smaller amounts.
Choosing Fertilizers: Organic fertilizers are ideal, as they release nutrients gradually, avoiding over-fertilization while nurturing soil health. Look for balanced N-P-K ratios, such as 5-5-5. Popular options include:
- Liquid Fish Emulsion: High in nitrogen, great for leafy growth. Dilute as directed.
- Seaweed Extract: Provides trace minerals and boosts plant resilience.
- Compost Tea: Gentle and nutrient-rich, made by steeping compost in water.
- Slow-Release Organic Granules: Gradually feed plants over weeks or months.
Fertilizing Schedule: Apply liquid fertilizers every 2–4 weeks during active growth seasons. Slow-release granules can be added every few months. During dormant winter months, reduce or stop fertilizing as growth slows.
Signs of Over-Fertilization:
- Burnt leaf tips or edges due to excess salt buildup.
- Yellowing leaves (especially between veins) from nutrient imbalances.
- Stunted growth despite abundant nutrients.
- White crust forming on the soil surface from salt accumulation.
If over-fertilization occurs, flush the soil thoroughly with water to remove excess salts.
Signs of Under-Fertilization:
- Pale or yellowing leaves, indicating nitrogen deficiency.
- Slow or weak growth due to lack of essential nutrients.
- Leggy stems that struggle to support the plant.
For under-fertilization, begin feeding with a diluted, balanced organic fertilizer to restore nutrient levels.
Pruning and Harvesting for Continuous Growth
Pruning and harvesting are key practices for maintaining healthy, productive herbs while also extending their lifespan. Beyond providing fresh leaves, these techniques encourage bushier growth and help prevent premature bolting.
Why Pruning Works: Removing the growing tip of a stem reduces auxin, a hormone that suppresses lateral bud growth. This redirection stimulates the side shoots, resulting in a fuller, bushier plant with more foliage for harvesting.
How Pruning Prevents Bolting: Bolting occurs when a plant focuses on producing flowers and seeds at the expense of its leaves. This often results in diminished flavor and leaf production. Regularly trimming the top growth and flower buds signals the plant to continue focusing on leafy growth.
Herb-Specific Harvesting Techniques:
- Basil: Snip above a node to encourage two new stems. Remove flower spikes promptly.
- Cilantro: Harvest outer leaves from the base, avoiding full removal. Keep in cooler spots and trim flower stalks to delay bolting.
- Mint: Cut stems as needed, which prevents legginess and encourages fresh growth.
- Thyme: Trim stem tips or sprigs, steering clear of the woody parts.
- Parsley: Pick outer stems near the base while leaving the inner growth intact.
- Chives: Snip leaves near the base, leaving about an inch. Remove flowers to encourage leaf production.
- Oregano: Clip sprigs as needed; regular pruning promotes bushiness.
- Rosemary: Trim the tips or individual leaves but avoid cutting into woody growth.
- Dill: Harvest feathery leaves or mature seeds, noting that leaf flavor may reduce after flowering.
To ensure your herbs thrive and recover well after pruning or harvesting, follow these general tips. Always use clean, sharp tools to make precise cuts and reduce unnecessary stress on the plants. Harvest in the morning, after dew has dried but before the heat of the day, as this is when essential oils are at their peak, resulting in maximum flavor. Be mindful not to remove more than one-third of the foliage at a time; taking too much can overwhelm the plant and slow its regrowth.
Monitoring for Pests and Diseases
Indoor herb gardens are less prone to pests and diseases than outdoor setups, but regular monitoring is essential for early detection and control. Common pests include aphids, which suck sap and leave behind sticky honeydew, spider mites, recognizable by their fine webs and speckled leaf damage, and fungus gnats, whose larvae feed on roots in overwatered soil. Effective, non-toxic remedies include manual removal, insecticidal soap, neem oil, water sprays, sticky traps, and even beneficial insects like ladybugs for larger setups.
Diseases such as powdery mildew can appear as white, powdery spots on leaves, thriving in humid conditions with poor airflow. Prevention includes ensuring good air circulation, avoiding overwatering, maintaining cleanliness, and carefully inspecting new plants for signs of disease.
Treatment methods for powdery mildew involve improving ventilation, pruning affected leaves, using a baking soda solution or neem oil, and avoiding direct sunlight during application.
Rotating Your Plants
Plants on windowsills naturally grow towards their light source, which can result in uneven growth, leaning stems, and shadowed areas that hinder photosynthesis. If left in the same position, the side facing the window will grow more vigorously, while the shaded side may experience weaker growth, yellowing leaves, or reduced flavor in herbs.
To prevent this, rotate your plants regularly—every few days or once a week—to give all sides equal exposure to sunlight. This practice promotes balanced, uniform growth, leading to bushier, healthier herbs with strong stems and an even distribution of foliage. Consistent rotation not only ensures better overall health but also enhances the appearance and productivity of your plants. A little turn goes a long way!
Common Windowsill Herb Garden Issues
Even with the best care, you might encounter challenges in your windowsill herb garden. Here’s a guide to diagnosing and solving common problems:
Yellowing Leaves: This is a common sign of stress and can have several causes:
- Overwatering: As discussed earlier, soggy soil deprives roots of oxygen, leading to root rot and an inability to absorb nutrients. Yellowing often starts with the lower leaves. Solution: Allow the top inch or two of soil to dry out completely before watering again. Ensure your pots have good drainage.
- Underwatering: If the soil becomes excessively dry, the plant can’t transport nutrients effectively, leading to wilting and yellowing, often starting with the lower leaves becoming crispy. Solution: Water thoroughly when the top inch of soil feels dry.
- Nutrient Deficiency: Lack of essential nutrients (especially nitrogen) can cause overall pale green or yellowing leaves, often starting with older leaves. Solution: Fertilize with a balanced organic fertilizer according to the instructions.
- Nutrient Toxicity (Over-fertilization): Excessive fertilizer can burn the roots and lead to yellowing or browning leaf tips and edges. Solution: Flush the soil thoroughly with water several times to remove excess salts. Reduce the frequency and strength of your fertilizer applications.
- Insufficient Light: Lack of adequate light can cause the plant to struggle to photosynthesize, leading to pale or yellowing leaves, often accompanied by leggy growth. Solution: Move the plant to a brighter location or supplement with a grow light.
- Natural Aging: Older, lower leaves will naturally yellow and die off as the plant focuses its energy on new growth. This is usually not a cause for concern if it’s only a few leaves at the bottom. Solution: Simply remove the yellowed leaves.
Leggy Growth: This is characterized by long, spindly stems with few leaves, as the plant stretches excessively towards a light source.
- Insufficient Light: The most common cause. The plant is trying to reach more light. Solution: Move the plant to a location with more direct sunlight or supplement with a grow light placed close to the plants.
- Overcrowding: If plants are too close together, they may compete for light and stretch upwards. Solution: Thin out seedlings or repot individual plants into larger containers with more space.
- Lack of Pruning: Not pinching back the growing tips encourages upward growth rather than bushiness. Solution: Regularly prune the tops of your herbs to encourage lateral growth and a more compact shape.
Mold or Fungus on Soil: This usually indicates overly moist conditions and poor air circulation.
- Overwatering: Keeps the soil consistently wet, creating a favorable environment for fungal growth. Solution: Reduce watering frequency and allow the topsoil to dry out between waterings.
- Poor Airflow: Stagnant air traps moisture on the soil surface. Solution: Improve air circulation by slightly opening a nearby window (when weather permits) or using a small fan on a low setting.
- Decomposing Organic Matter: Sometimes, decaying plant debris on the soil surface can lead to mold growth. Solution: Remove any dead leaves or other organic matter from the soil surface.
- Type of Potting Mix: Some potting mixes retain more moisture than others. Solution: Consider using a potting mix with better drainage, especially for herbs that prefer drier conditions. You can also try gently scraping off the mold from the soil surface. In severe cases, you might need to repot the plant with fresh, well-draining potting mix.
Lack of Flavor: The intensity of an herb’s flavor is influenced by several factors:
- Insufficient Light: Light is crucial for the production of essential oils that give herbs their characteristic flavors.10 Solution: Ensure your herbs are receiving adequate sunlight (at least 6-8 hours for full-sun herbs).
- Poor Soil: Soil lacking in essential nutrients may not support the production of flavorful oils. Solution: Use a good quality potting mix and fertilize appropriately.
- Overwatering: Can dilute the concentration of essential oils. Solution: Water correctly, allowing the soil to dry slightly between waterings.
- Bolting: Once a plant starts to flower, its energy is directed towards seed production, and the flavor of the leaves can become less intense or even bitter. Solution: Regularly prune off flower buds to encourage continued leafy growth. Harvest leaves before or just as the plant begins to bolt.
- Harvesting Time: The best time to harvest for maximum flavor is usually in the morning after the dew has dried but before the heat of the day.
Sudden Wilting: This can be alarming and usually indicates a problem with the roots or water supply.
- Root Rot (Overwatering): Damaged roots cannot absorb water, leading to wilting even if the soil is wet. Solution: Check the roots for signs of rot (brown, mushy). If root rot is present, you may need to repot the plant with fresh soil after removing the affected roots. Adjust your watering habits.
- Severe Underwatering: If the soil has been allowed to dry out excessively, the plant will wilt dramatically. Solution: Water thoroughly and see if the plant recovers. In severe cases, you may need to rehydrate the soil by placing the pot in a dish of water and allowing it to soak up moisture from the bottom.
- Transplant Shock: If you’ve recently repotted your herb, it may experience temporary wilting as the roots adjust to the new environment. Solution: Provide consistent moisture and some shade for a few days to help the plant recover.
- Root Damage: Physical damage to the roots during transplanting or other disturbances can also cause wilting. Solution: Handle the roots carefully when repotting.
Pest Infestations: Identifying the specific pest is key to choosing the right solution.
- Aphids: Small, green, black, or other colored bugs clustered on new growth. Solution: Wipe them off with a damp cloth, spray with insecticidal soap, or use a strong jet of water.
- Spider Mites: Tiny, spider-like creatures that create webs and cause leaf stippling. Solution: Increase humidity (they dislike moist conditions), spray with insecticidal soap or neem oil, ensuring you cover the undersides of leaves.
- Fungus Gnats: Small flies around the soil. Solution: Allow the top inch of soil to dry out between waterings. Use yellow sticky traps to catch adults. In severe cases, you can use a soil drench containing Bacillus thuringiensis israelensis (Bti).
- Whiteflies: Small, white, fly-like insects that flutter when disturbed and suck sap from leaves. Solution: Use yellow sticky traps, spray with insecticidal soap, or gently vacuum them off the plants.
- Scale Insects: Small, immobile, shell-like bumps on stems and undersides of leaves, sucking sap. Solution: Gently scrape them off with your fingernail or a cotton swab dipped in rubbing alcohol. Follow up with insecticidal soap or neem oil.
When using any treatment (even natural ones), always test it on a small area of the plant first to ensure it doesn’t cause any adverse reactions.
Frequently Asked Questions
Can I grow herbs indoors year-round?
Yes, you can grow many herbs indoors year-round, thanks to the controlled environment that shields plants from harsh weather conditions. However, seasonal adjustments are important for optimal growth. During shorter daylight months (like winter), using a grow light on a timer can compensate for reduced natural light. Growth rates may slow during cooler months, so reduce watering slightly to prevent overwatering. Consistent temperature (65–75°F or 18–24°C) and humidity levels are also essential. With proper care, herbs like basil, parsley, mint, thyme, and oregano can thrive indoors throughout the year!
What if my windowsill doesn’t get enough sunlight?
Yes, herbs can thrive indoors year-round even in low-light conditions. Use LED grow lights to supplement natural light, and focus on shade-tolerant herbs like mint and parsley. Rotate plants and use reflective materials to enhance light exposure.
How often should I water different types of herbs?
The frequency of watering herbs varies based on the type, environment, and pot used. Follow the “moist but not soggy” rule, checking soil moisture 1–2 inches deep. Mediterranean herbs like rosemary and thyme prefer drying out slightly, while basil and mint need more consistent moisture. Water less in cooler months, as growth slows. Adjust for pot size, as smaller or terracotta pots dry out faster. Observe your plants—wilting or discoloration can signal issues.
Do I need special soil?
Yes, special soil is essential for indoor herbs. Use a high-quality potting mix designed for containers to ensure good drainage, aeration, and water retention. Avoid garden soil, as it may be too dense and contain pests. Customize the mix for specific herbs—for well-draining soil, add perlite or sand; for moisture-loving herbs, include extra peat moss or coconut coir.
How long does it take for herbs to grow from seed?
Herbs take varying times to grow from seed to harvestable size depending on the species. Fast growers like basil, chives, dill, and cilantro take about 4–8 weeks, while slower growers like parsley, thyme, oregano, and rosemary may need 8–12+ weeks. Refer to seed packets for details, start seeds indoors early, or use seedlings for quicker results.
Can I use tap water?
Tap water can often be used for watering indoor herbs, but issues like chlorine and minerals may arise. Let tap water sit for 24–48 hours to allow chlorine to dissipate; for chloramine, use a water filter or rainwater. Hard water with high mineral content can cause soil buildup—mitigate this by using distilled water, rainwater, or filtering, and occasionally flushing the soil. Monitor plants for signs of stress or mineral accumulation to ensure their health.
How do I know when to harvest?
Harvest herbs when leaves are mature and tender for optimal flavor, ensuring plants are well-established with multiple sets of true leaves. Regular harvesting prevents bolting, so pick leafy herbs before flowering. For best taste, harvest in the morning after dew dries, but avoid taking more than one-third of the foliage to keep plants healthy.
Can I grow different herbs together in one container?
Yes, you can grow different herbs together in one container, but compatibility is key. Group herbs with similar light, water, and soil needs (e.g., rosemary, thyme, and oregano). Avoid pairing herbs with conflicting needs, like basil (prefers moisture) and rosemary (prefers dry). Keep vigorous growers like mint separate to prevent overcrowding. Use a large container to accommodate multiple root systems effectively.
How do I overwinter indoor herbs?
To overwinter indoor herbs, water less frequently and let the soil dry slightly between waterings, as growth slows in winter. Stop or reduce fertilization and provide adequate light, using grow lights if natural light is limited. Keep herbs away from drafts and maintain consistent temperatures. Lightly prune for shape and expect dormancy in perennials, while annuals like basil may need restarting from seed or cuttings in spring.
Conclusion
No matter where you are in the world, whether you have a sprawling balcony or just a sunny windowsill, the joy and benefits of growing your herbs indoors are within reach. It’s an accessible and rewarding hobby that connects you to the natural world, enhances your culinary creations, and brings a touch of vibrant life into your home. So, take that first step, sow those seeds, and savor the journey of cultivating flavor and greenery right on your windowsill!
Gardening, in any form, is a continuous learning process. Don’t be afraid to experiment with different types of herbs, try various planting techniques, and observe how your plants respond to their environment. Each herb has its unique needs and characteristics, and discovering what works best in your specific space is part of the fun. Explore globally relevant herbs and adapt your methods based on your local climate and conditions. There’s a wealth of information available online and in gardening communities to support your ongoing learning.

I’m John Doe, a Certified Master Gardener with over 20 years of hands-on experience in cultivating healthy and vibrant gardens. My expertise spans organic gardening, soil science, and sustainable pest control. I’ve worked extensively with community gardens and have a deep passion for sharing my knowledge to help others succeed in their gardening endeavors.


