

How to Start Your First Garden
Starting your first garden is an exciting adventure! It’s a chance to get your hands dirty, learn something new, and grow your food. You might feel a little nervous, but trust me, it’s easier than you think. Even if things don’t go perfectly at first, that’s okay!
Gardening teaches patience, adaptability, and the joy of nurturing life. Every challenge, whether it’s a stubborn seed or a surprise pest, is an opportunity to learn and grow alongside your plants. It’s such a rewarding journey that mirrors nature’s rhythm and resilience. Gardening is an adaptable hobby that fits any space, from compact balconies to sprawling backyards. With a bit of creativity and the right plants, you can design a lush and fulfilling garden no matter the size. It’s all about making the most of what you have and enjoying the process of growth and transformation.
This guide will walk you through the steps to get your first garden started, from choosing the perfect spot and preparing the soil to nurturing your plants and celebrating your successes. You’ll learn how to select the right plants for your climate, how to care for them properly, and how to troubleshoot any challenges that may arise.
Step 1: Planning Your First Garden
Starting a garden begins with a little bit of planning to set yourself up for success. Taking the time to plan thoughtfully will save you effort and frustration down the road. It’s like creating a blueprint for your green oasis! Let’s explore the key things to think about.
Choosing the Ideal Location
Sunlight is essential for plants as it powers the process of photosynthesis—their way of creating food and energy. Plants transform sunlight, water, and carbon dioxide into glucose, which fuels their growth. Those that bear fruits or vegetables thrive best with 6 to 8 hours of direct sunlight daily, ensuring robust development and productive harvests. It’s fascinating how nature orchestrates this energy exchange! To find the sunny spots in your yard, watch how the sun moves throughout the day. Notice which areas are sunny in the morning, during midday, and in the afternoon. The spots that get sun for most of the day are your best bet. If you only have a spot that gets less sun (partially shady), don’t worry! Plenty of plants, like leafy greens and certain flowers, grow with minimal direct sunlight, allowing you to still enjoy a vibrant and productive garden. Adaptability is key!
- Look for an area that receives plenty of sunlight—most garden plants need at least 6–8 hours of direct sunlight daily.
- Consider water access; a spot close to a hose or watering source is ideal.
- Observe your chosen location’s drainage. Avoid areas where water tends to collect after rain, as soggy soil can harm your plants.
If you’re gardening indoors, pick sunny spots like windowsills or use grow lights for plants that need more sunlight.
Understanding Your Space
When you’re starting your first garden, it’s often best to start small. A smaller garden is easier to take care of, so you can learn the basics without feeling overwhelmed. You could start with a small raised garden bed, or even a few containers on a patio or balcony. Think about how much space you have available and how much time you realistically have to spend gardening. You can measure your potential garden area with a measuring tape to get an idea of its size. Visualize how you might arrange your plants in that space, keeping in mind how big they will get.
- Evaluate how much room you have to garden. A big yard allows for traditional garden beds, but even small spaces work well with raised beds or container gardening.
- Maximize space by planning for vertical gardening, such as trellises for climbing plants like beans or cucumbers.
- If you’re short on outdoor space, opt for pots and planters that fit on balconies, patios, or shelves.
Selecting the Right Plants
Choosing the right plants is super important for a successful first garden. You’ll want to pick plants that are well-suited to the climate where you live and the type of soil you have. Beginners often have the most success with plants that are known to be easy to grow.
Here are a few examples of beginner-friendly plants:
Herbs: Basil and mint are excellent beginner-friendly herbs! They’re both hardy and thrive in containers, making them perfect for small spaces or indoor gardening. Basil loves sunny spots, while mint is a bit more adaptable and even tolerates partial shade. These herbs not only grow easily but also add delightful flavors to your meals, making them a rewarding choice for any gardener.
Vegetables: Lettuce and radishes are fantastic choices for beginners! These fast-growing vegetables provide a quick sense of achievement, making gardening an encouraging experience. Lettuce thrives in cool weather and is perfect for multiple harvests, while radishes mature in just a few weeks, offering crisp and flavorful rewards. Both are simple to grow and bring fresh, homegrown produce to your table in no time!
Flowers: Marigolds and zinnias are wonderful flowers for beginners! They are hardy, easy to grow, and bring vibrant bursts of color to any garden. Marigolds are known for their bright orange and yellow hues, as well as their ability to repel certain pests. Zinnias, on the other hand, come in a variety of colors and bloom profusely, making them a cheerful addition. Both flowers thrive with minimal care, making them perfect for creating a lively and low-maintenance garden!
These plants are often chosen by beginners because they can handle a bit of learning on your part and tend to grow relatively easily. To figure out what plants will grow best in your specific area, you can look up your plant hardiness zone online or check with your local agricultural extension office or a reputable gardening website. These resources can provide valuable information about your local growing conditions.
- Start with easy-to-grow plants. Herbs like basil and mint, vegetables like lettuce and radishes, and flowers like marigolds and zinnias are great beginner choices.
- Consider plants that suit your environment. For example, if your yard is shady, opt for plants that tolerate lower light, such as spinach or hostas.
- Research the growing seasons for your chosen plants. Some plants thrive in cooler weather, while others need warm conditions.
Local garden centers often recommend plants that perform well in your area’s climate.
Considering Your Goals
Think about what you hope to get from your first garden. Do you dream of colorful flowers to brighten your space? Would you love to cook with fresh herbs? Or are you excited about growing your vegetables to eat? Knowing your goals will help you narrow down your plant choices and make your first gardening experience even more rewarding.
- Decide what you hope to achieve with your garden.
- Food Production: Do you want to grow vegetables, fruits, or herbs for cooking?
- Aesthetics: Are you aiming for a beautiful flower garden to enhance your space?
- Wellness: Maybe you’re gardening to relax, reduce stress, or improve air quality indoors.
- If sustainability is a priority, explore eco-friendly gardening practices like composting, natural pest control, and water conservation.
Step 2: Soil Preparation for Your First Garden
Healthy soil is the secret to happy and thriving plants in your first garden. Think of the soil as the foundation for your green friends – it provides them with the food they need (nutrients), holds the right amount of water so they don’t get too thirsty or drown (water retention and drainage), and gives their roots a place to anchor and grow strong.
- Understand Your Soil:
To give your plants the best start, it’s helpful to know a little bit about the soil you already have. Start by learning about the type of soil you have. Is it sandy, clay-like, or loamy? Loamy soil is the best for gardening because it holds water well while allowing for good drainage. If you’re unsure, you can grab a handful of moist soil and squeeze it—loamy soil will hold its shape but crumble easily when touched. - Clear the Area:
Remove any weeds, grass, or debris from your garden space. This prevents competition for nutrients and gives your plants a clean space to grow. Be sure to pull weeds out by the roots to stop them from growing back. - Test Your Soil:
One important thing to understand is soil pH. This is a measure of how acidic or alkaline your soil is. It matters because it affects how well your plants can take up the nutrients they need. Most garden plants thrive in soil that’s slightly acidic to neutral, with a pH of 6.0 to 7.0. Check your soil’s pH and nutrient levels. You can use a simple home soil testing kit to find this out. If the soil is too acidic or alkaline, you can amend it with materials like lime (to raise pH) or sulfur (to lower pH). If you want a more detailed analysis of your soil’s nutrients, you can also consider sending a sample to a professional soil testing lab, but for a first garden, a home kit is often a great start. - Add Organic Matter:
One of the best things you can do for your garden soil is to add organic matter. This is anything that was once living, like compost (broken-down food scraps and yard waste), aged manure, or leaf mold (decomposed leaves). Organic matter improves soil structure and boosts its fertility. Spread a layer of compost, aged manure, or leaf mold (decomposed leaves) over your garden bed. This helps sandy soil hold moisture and loosens heavy clay soil for better drainage. To incorporate organic matter, simply spread a layer of compost or other amendment over your garden bed and mix it into the top few inches (6–8 inches (15–20 cm), of soil before planting. Mix it into the top 6–8 inches (15–20 cm) of soil. - Loosen the Soil:
Use a spade, fork, or tiller to break up compacted soil. Loosening the soil allows roots to grow easily and helps water and air reach deeper layers. - Level the Surface:
After mixing in organic matter and loosening the soil, use a rake to level the surface. This makes planting easier and ensures water spreads evenly. - Optional Mulching:
If you’re not planting immediately, consider adding a layer of mulch over your soil. Mulch prevents weeds, retains moisture, and keeps your soil ready for when you’re ready to plant.
Finally, it’s important to make sure your soil has good drainage. If the soil stays soggy for too long, the roots of your plants can rot and they won’t be able to get the air they need. If heavy clay soil tends to stay soggy, adding organic matter or building raised beds—elevated garden beds that allow excess water to drain—can make a significant difference.
Step 3: Planting Your Chosen Plants
Now comes the exciting part – putting your plants in the ground! To give them the best possible start in your first garden, it’s important to follow a few simple guidelines. Here’s a simple and detailed guide to make sure your planting is successful:
Know Your Plants’ Needs
Different plants have unique requirements to grow well. To give them the best start, always check the seed packet or plant tag for these important details:
- Planting Depth:
- This tells you how deep to place the seed or seedling in the soil.
- If you plant too shallow, the seed might dry out before it can sprout. If you plant too deep, the seedling may struggle to reach the surface for sunlight.
- Follow the depth instructions carefully for the healthiest growth.
- Spacing:
- Spacing explains how far apart to place each plant.
- When plants are too crowded, they have to fight for water, sunlight, and nutrients. Crowding can also increase the risk of diseases spreading between plants.
- Proper spacing gives roots room to spread and leaves space to grow freely.
- Sunlight Needs:
- Sunlight is crucial, and many plants thrive in full sun, meaning they need at least 6 to 8 hours of direct sunlight daily.
- Watch your garden to find sunny spots, and plant sun-loving vegetables and flowers there.
- If the plant prefers partial shade, pick areas with less direct sun, like those shaded during part of the day.
Planting Seeds
Planting seeds is a simple and rewarding process. Here’s a detailed breakdown to make sure your seeds get off to a great start:
- Create a Small Hole:
Using your finger, a stick, or a garden tool, make a small hole in the soil. The depth of the hole should match what’s recommended on the seed packet—this ensures the seed isn’t buried too shallow or too deep. A general rule is to plant seeds at a depth that’s about twice their size. - Place the Seed in the Hole:
Drop one seed into each hole. Be gentle to avoid damaging the seed. If the seed is very small, you can pinch it lightly between your fingers or use tweezers for precision. - Cover the Seed with Soil:
Carefully fill the hole with loose soil, ensuring it’s evenly distributed over the seed. The soil shouldn’t be packed too tightly, as seeds need air to germinate. - Press Lightly:
Gently press the soil down with your fingertips or the back of your hand to ensure the seed has good contact with the soil. This helps the seed absorb moisture from the surrounding soil, which is crucial for germination. - Water Gently:
After planting, give the soil a light watering. Use a watering can or a hose with a gentle spray to avoid washing away the seeds. Keep the soil moist but not soggy while the seeds germinate.
Planting Seedlings (Young Plants)
Planting seedlings is a simple and rewarding process, but care is needed to make sure they adapt well to their new home. Here’s how to do it right:
- Remove the Seedling Gently:
- Hold the seedling by its base (where the stem meets the soil) and carefully tip the container upside down.
- Gently squeeze or tap the sides of the container to loosen the roots and soil.
- Avoid pulling on the stem, as it can damage the plant. Be as gentle as possible to protect the roots.
- Prepare the Planting Hole:
- Use a hand trowel or garden spade to dig a hole that’s slightly larger than the seedling’s root ball (the clump of roots and soil around the base).
- A bigger hole ensures there’s enough space for the roots to spread out comfortably.
- Position the Seedling:
- Place the seedling into the hole so it sits at the same depth it grew in its container. The base of the stem should be level with the soil surface.
- If the seedling is planted too deep, the stem might rot. If it’s too shallow, the roots may dry out or be exposed.
- Fill the Hole:
- Gently backfill the hole with loose soil, covering the root ball completely.
- Use your hands to lightly pat the soil down around the base of the plant to hold it in place. This helps eliminate air pockets, which can cause roots to dry out.
- Water Thoroughly:
- After planting, give the seedling a good soak with water. This helps the soil settle around the roots and provides much-needed moisture as the plant adjusts to its new environment.
- Optional Mulching:
- Add a thin layer of mulch around the seedling to help retain soil moisture and regulate temperature. Keep the mulch a few inches away from the stem to prevent rotting.
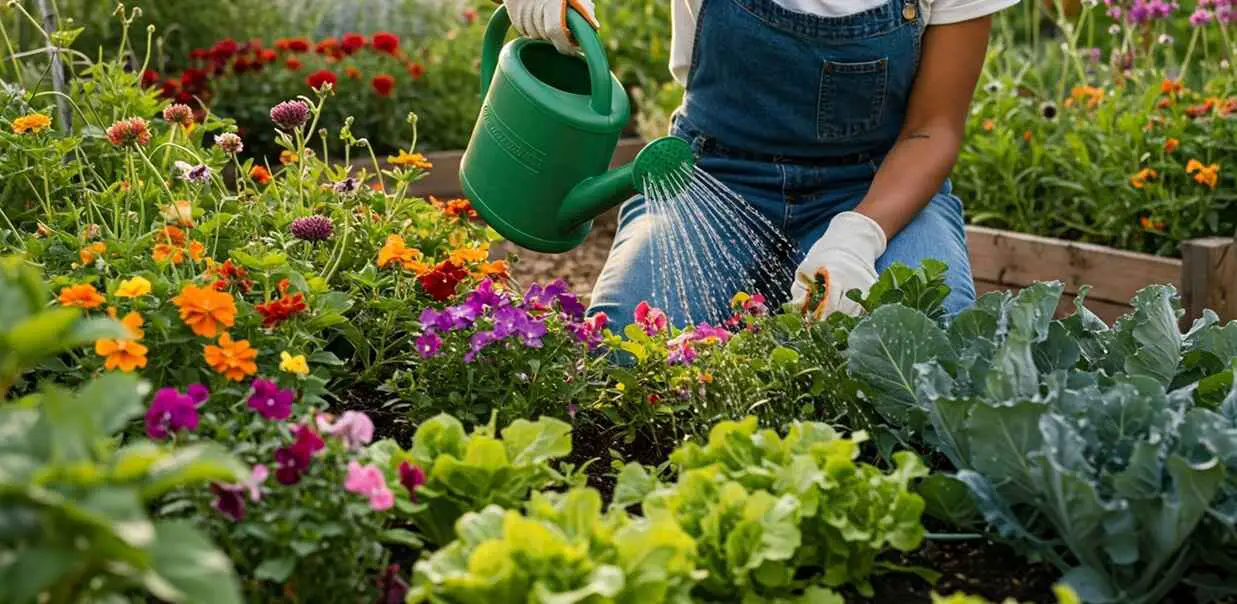
Water Immediately
Watering your seeds or seedlings right after planting is a crucial step for their health and development. Here’s why it’s important and how to do it:
- Why Immediate Watering Matters:
- When you plant seeds or seedlings, the soil around them is loose. Watering right away helps settle the soil, ensuring good contact between the seed or roots and the surrounding soil. This contact is important for absorbing moisture and nutrients.
- Seeds need water to start the germination process, while seedlings depend on moisture to adjust to their new environment and grow strong roots.
- How to Water Thoroughly:
- Use a watering can or hose with a gentle spray setting to avoid disturbing the seeds or seedlings.
- Pour enough water so that the soil is evenly moist, but not overly soggy or flooded.
- For seedlings, focus the water at the base of the plant to directly nourish the roots rather than wetting the leaves unnecessarily.
- Follow-Up Care:
- Keep the soil consistently moist for the first few weeks, which helps seeds sprout and seedlings establish their roots. Regular checks will let you know if they need more water.
- Watering deeply rather than frequently encourages roots to grow downward for stability and access to nutrients.
Watch for Support Needs
Some plants, like tomatoes, peas, and climbing beans, naturally grow tall or sprawl as they develop. These plants often need extra support to stay upright and healthy. Here’s how to provide the right support:
- Why Support is Important:
- As these plants grow, their stems and branches can become heavy with leaves, flowers, or fruit. Without support, they might bend, break, or lie on the ground, making them more prone to diseases and pests.
- Adding stakes, cages, or trellises gives the plants a sturdy structure to grow on, helping them reach their full potential.
- Choose the Right Support:
- Stakes: Great for plants like tomatoes. Use wooden, bamboo, or metal stakes placed next to the plant and tie the stem to the stake with soft ties or cloth strips.
- Cages: Ideal for bushier plants like determinate tomatoes or peppers. Place a circular cage over the plant to support its growth in all directions.
- Trellises: Perfect for climbing plants like peas and beans. A trellis provides vertical support, saving space while allowing the plants to climb upward.
- When to Add Support:
- Install stakes, cages, or trellises immediately after planting. Doing this early ensures you don’t disturb the roots later when the plant is bigger. Adding support too late can accidentally damage or displace the roots.
- Keep an Eye on Growth:
- As your plants grow, check that they’re securely attached to the support structure. Use gentle ties to guide the plant’s stems or vines, and adjust them as needed to prevent overcrowding or strain.
Step 4: Caring for Your First Garden
Once your plants are settled in your first garden, consistent care will ensure they grow strong and produce their best. Here are some essential tips to keep in mind:
Watering
Watering your garden may seem straightforward, but doing it the right way makes a big difference for your plants’ health. Here’s how to ensure your plants get the moisture they need without causing problems:
- Moist But Not Soggy:
Plants like soil that feels damp, similar to a squeezed-out sponge, but not soaked. Soggy soil can drown the roots, preventing them from getting the oxygen they need. Overwatering can also cause root rot, where the roots become damaged and stop working. - Check the Top Inch:
An easy way to know if your plants need water is to touch the soil. Stick your finger into the top inch of soil. If it feels dry, then it’s time to water. If it still feels damp, wait a day or two before watering. - Water Deeply:
When you water, make sure the water reaches deep into the soil, not just the surface. Deep watering helps the roots grow down into the soil where they can find water and nutrients. Use enough water to soak the soil several inches down, but don’t let it pool or flood. - Time of Day Matters:
Water your plants early in the morning or late in the evening. Watering during the hottest part of the day means much of the water evaporates quickly, leaving your plants thirsty. Morning watering gives plants moisture to stay strong during the heat of the day, while evening watering allows them to absorb water overnight. - Avoid Wet Leaves at Night:
Be careful not to leave the leaves wet overnight, as this can lead to fungal diseases. Try to water directly at the soil level rather than spraying the leaves. Using a watering can or hose with a nozzle helps focus the water around the base of the plants.
Weeding
Weeding is an important part of caring for your garden. Here’s why and how to manage weeds:
- Why Weeding Matters:
Weeds compete with your plants for water, sunlight, and nutrients in the soil. If left to grow, they can steal these essentials, leaving your garden plants weaker and less productive. - Regular Weeding:
It’s best to remove weeds often, before they grow too big. Smaller weeds are easier to pull out, and regular weeding keeps them from spreading and taking over your garden. - Pull the Roots:
Make sure to remove the entire weed, including its roots. If you only take the top part, the weed can grow back. Use your hands or a gardening tool to dig out the roots for better results. - When to Weed:
Weeding is easier when the soil is moist, like after watering or rain. Moist soil softens around the roots, making them easier to pull out completely without breaking. - Mulch Can Help:
Adding mulch around your plants can block sunlight from reaching weed seeds, stopping them from sprouting. It also helps reduce the need for frequent weeding.
Feeding
Feeding your plants is a way to replenish nutrients in the soil and help them grow strong and healthy. Here’s how to do it simply and safely:
- Why Plants Need Feeding:
Over time, plants use up the nutrients in the soil. Feeding adds back those essential elements, like nitrogen, phosphorus, and potassium, that your plants need to thrive. - Types of Plant Food:
- Compost: This is a natural option made from decomposed food scraps, yard waste, or leaves. It improves soil texture and slowly releases nutrients.
- Organic Fertilizer: Balanced organic fertilizers are easy to use and provide a mix of nutrients. Look for ones labeled as “general-purpose” or suited for specific plant types like vegetables or flowers.
- How to Feed Your Plants:
Add compost by spreading a layer over your soil and mixing it gently into the top few inches. For fertilizer, carefully read the instructions on the package. It will tell you how much to use, how often to apply, and where to place it (usually around the base of the plant, avoiding stems and leaves). - Avoid Over-Fertilizing:
Too much fertilizer can damage your plants by burning their roots. Follow the recommended amounts on the label, and start with less if you’re unsure.
Pest Care
Dealing with pests is part of gardening, but with simple methods, you can keep them under control and protect your plants. Here’s how to manage pests effectively:
- Watch for Signs of Trouble:
Regularly check your plants for signs of pests, like holes in leaves, sticky spots, or bugs crawling around. Early detection helps prevent bigger problems. - Handpick Larger Pests:
For bigger pests like caterpillars or slugs, you can gently pick them off your plants by hand. Dispose of them far from your garden or in a way that prevents them from returning. - Use Natural Solutions for Smaller Pests:
Small pests, like aphids, can be managed with simple remedies. Mix a mild dish soap solution (a few drops of soap in water) and spray it on affected areas to tackle soft-bodied pests. Another option is neem oil, a natural product that works against many types of pests and even some fungal diseases. - Attract Helpful Insects:
Beneficial insects, like ladybugs and lacewings, can help control pests naturally. Plant flowers like marigolds, daisies, or dill to attract these friendly bugs to your garden. - Avoid Harsh Chemicals:
Stick to natural or mild solutions to protect the environment and avoid harming helpful insects. Chemical pesticides can be harmful and often aren’t necessary for beginner gardens.
Mulching
Mulching is a simple yet powerful way to help your garden thrive. Here’s how it works and why it’s so beneficial:
- Keeps Soil Moist:
Mulch acts like a protective cover for your soil, slowing down water evaporation. This means the soil stays moist longer, reducing how often you need to water your plants. - Regulates Soil Temperature:
Mulch creates an insulating layer. It keeps the soil cooler on hot days and warmer on cold nights, providing your plants with a more stable environment for root growth. - Reduces Weeds:
By blocking sunlight from reaching weed seeds in the soil, mulch helps prevent them from sprouting. This means less competition for your plants and less time spent weeding. - How to Apply Mulch:
Spread a layer of mulch about 2 to 3 inches thick around your plants. Use materials like straw, shredded leaves, or wood chips (avoid dyed ones). Be careful not to pile mulch directly against plant stems—leave a small gap of a few inches to prevent rot or disease. - Bonus Benefits:
As organic mulches (like straw or leaves) break down over time, they add nutrients to the soil, enriching it and supporting healthy plant growth.
Observation
Observation: Keeping Your Garden in Check
Observing your plants every day is a simple but powerful way to ensure they stay healthy and strong. Here’s how you can make the most of regular observation:
- What to Look For:
Pay attention to how your plants look and grow. Healthy plants will have vibrant green leaves, sturdy stems, and steady growth. Keep an eye out for any changes, such as yellowing leaves, drooping stems, spots, or holes in the leaves. These signs may point to pests, diseases, or environmental issues. - Check the Soil:
Feel the soil near your plants. If it feels dry, your plants might need water. If it looks overly wet, you might need to adjust your watering to prevent root problems. - Inspect Plants Closely:
Get up close to your plants and examine their leaves, stems, and even the underside of leaves. This helps you spot pests early, like aphids or caterpillars, before they cause major damage. - Monitor Growth:
Watch how your plants are growing over time. Are they putting out new leaves or flowers? Is there any unusual stunting in their growth? Regular monitoring helps you catch problems early so you can address them before they worsen. - Act Quickly:
If you notice something wrong, take action right away. For example, remove weeds if they’re competing with your plants, adjust watering if the soil seems too dry or wet, or use natural pest control methods if pests are present. - Enjoy the Process:
Observation isn’t just about looking for problems—it’s also a chance to admire your plants’ progress and enjoy the beauty of your garden.
Patience
Gardening is not an instant process—it’s a gradual and rewarding journey. Here’s how to embrace patience and find joy in every moment:
- Understand Growth Takes Time:
Plants develop at their own pace, from tiny sprouts to mature plants. Some grow quickly, like lettuce or radishes, while others, like tomatoes or peppers, need more time. Patience allows you to appreciate the natural rhythm of growth. - Appreciate Each Stage:
Take time to celebrate every step in your plants’ journey. Whether it’s the first leaves, a new flower, or the beginning of fruit, every milestone is a sign of progress and care. Even the smallest growth is worth enjoying! - Stay Observant and Engaged:
Watch your garden closely and notice how plants change day by day. Observing these gradual transformations helps deepen your connection and appreciation for your plants. - Focus on the Process, Not Just the Result:
Gardening isn’t only about the harvest—it’s also about the experience of nurturing life. Enjoy tending to your plants, caring for the soil, and learning new techniques along the way. - Learn Through Practice:
Mistakes and challenges are part of gardening, especially for beginners. View them as opportunities to learn and improve rather than setbacks. - Relax and Enjoy Nature:
Spend time in your garden as a way to unwind and connect with nature. Whether you’re watering, weeding, or simply sitting among your plants, let the process bring you peace and satisfaction.
Tips for a Successful First Garden
Remember, gardening is a learning process, and it takes time for your plants to grow and for you to get the hang of things. Don’t be discouraged if you don’t see perfect results right away. Pay close attention to your plants – careful observation is one of the best ways to learn what they need. Notice how their leaves look, how the soil feels, and if you see any changes.
Don’t hesitate to seek out local resources for help and advice. Garden centers often have friendly, knowledgeable staff who can offer advice and recommend plants or products suited to your area. Chatting with experienced neighbors who garden can also provide valuable tips specific to your local climate. Additionally, joining online gardening communities is a great way to share experiences, ask questions, and connect with both beginners and seasoned gardeners.
It can also be really helpful to keep a simple garden journal. You can note down when you planted different things, your watering schedule, what the weather has been like, and any observations you make about your plants’ growth and health. This record can be a valuable resource as you learn what works best in your garden.
Most importantly, encourage yourselves to appreciate every stage of growth, from the first tiny sprout pushing through the soil to the development of leaves, flowers, and eventually, fruits or vegetables. There’s a special kind of satisfaction in watching something you planted grow.
Finally, remember that gardening can be incredibly therapeutic and productive. Spending time outdoors, connecting with nature, and nurturing living things can be a wonderful way to relax and de-stress. Enjoy the journey and the connection you’re building with your first garden!
Frequently Asked Questions About Starting Your First Garden
Q. Is starting a garden hard?
Not really! It takes a little effort to get started, but if you follow some simple steps, it can be easier and more fun than you think.
Q. How much sunlight does my garden need?
Most vegetables and flowers need at least 6 to 8 hours of direct sunlight every day. Watch your yard to see where the sun shines the longest.
Q. What if my yard is mostly shady?
That’s okay! Many plants like lettuce, spinach, and hostas do well with less sun.
Q. Do I need a big yard to start a garden?
No! You can grow plants in pots on a balcony, in a small raised bed, or even on a sunny windowsill.
Q. What kind of soil should I use?
Use soil that drains well. You can make it better by adding compost.
Q. How often should I water my new plants?
Water them when the top inch of soil feels dry. Young plants usually need more water until their roots are strong.
Q. What are some easy plants for beginners?
Try herbs like basil and mint, vegetables like lettuce and radishes, or flowers like marigolds and zinnias.
Q. Do I need to use fertilizer?
Your plants will appreciate it! Starting with a balanced organic fertilizer or adding compost to your soil is a good way to give them the nutrients they need.
Q. How do I keep weeds out of my garden?
Pull them out regularly, especially when they’re small. Adding mulch can also keep weeds away.
Q. What if bugs start eating my plants?
Keep an eye on your plants. For small problems, you can often pick off the bugs by hand. Natural sprays like soapy water or neem oil can also help.
Q. How soon will I see results from my garden?
Some plants, like radishes, grow fast. Others, like tomatoes, take longer. Enjoy the process!
Q. What if I make mistakes?
That’s normal! Gardening is a learning adventure. Don’t be afraid to try things and learn from any mistakes you make.
Q. Where can I get more help with my garden?
Check out your local garden centers, talk to experienced gardening neighbors, or look for reliable gardening websites and resources online. Your local agricultural extension office is also a great source of information.
Conclusion: The Start of a Lifelong Passion
Take heart, new gardeners! Starting your first garden is absolutely within your reach. With a little effort and a sprinkle of patience, you can experience the magic of bringing plants to life.
Remember that this is just the beginning of what can become a lifelong passion. There’s always something new to learn and explore in the world of gardening.
There’s nothing quite like the pride and happiness that comes from cultivating your little patch of nature. Enjoy the process, celebrate the progress, and cherish every moment spent creating your green haven. Happy gardening!
Amazon Affiliate Product Recommendations:
- Soil Testing Kit – View on Amazon
- Organic Compost – View on Amazon
- Garden Mulch – View on Amazon
- Balanced Fertilizer – View on Amazon
- Neem Oil – View on Amazon

I’m John Doe, a Certified Master Gardener with over 20 years of hands-on experience in cultivating healthy and vibrant gardens. My expertise spans organic gardening, soil science, and sustainable pest control. I’ve worked extensively with community gardens and have a deep passion for sharing my knowledge to help others succeed in their gardening endeavors.


