

How to Grow Amaryllis
Amaryllis flowers are really pretty and big, like trumpets! It feels good to grow amaryllis yourself and watch them bloom. Many people like them, especially around certain holidays.
Amaryllis is a plant with the fancy name Hippeastrum. It grows from a bulb and gives us flowers in lots of colors, like red, pink, white, and orange. Sometimes they even have stripes! This guide will show you how to grow amaryllis successfully.
Growing amaryllis isn’t too hard, and you get these amazing flowers. But knowing a few important things will help you grow amaryllis even better and enjoy even more beautiful blooms.
This guide will tell you everything you need to know about how to grow amaryllis. We’ll talk about picking good bulbs, planting them inside and outside, taking care of them as they grow, and even how to get them to flower again.
Here’s what we’ll cover in this guide on how to grow amaryllis:
- Picking the best amaryllis bulbs
- Planting them in pots inside
- Growing them outside
- How to water and feed them
- Giving them the right light and temperature
- Helping the tall flowers stand up
- Getting them to flower again next year
- Common problems and how to fix them
- Answers to your questions
Step 1: Selecting Premium Amaryllis Bulbs

If you want to grow amaryllis with lots of big, healthy flowers, it all starts with picking the right bulbs. Think of the bulb as a tiny food storage for the plant – a good one has lots of energy to make beautiful blooms.
Where to Find Good Amaryllis Bulbs:
You can find amaryllis bulbs in a few places:
- Local Nurseries and Garden Centers: Check out the nearby nurseries and garden shops. They often have bulbs, especially when it’s the right planting season (usually around late autumn or early winter). Look for well-established garden centers in your area.
- Online Stores: Some websites sell bulbs and will ship them to your location. If you buy online, it’s a good idea to read reviews from other buyers to make sure the bulbs are good quality and that the seller is reliable. Look for reputable online bulb retailers.
- Local Markets (if applicable): Sometimes, during the right season, bulbs are sold in local markets. If you buy from a market, take a good look at the bulbs before you buy them.
What to Look For in a Healthy Amaryllis Bulb:
When you’re choosing a bulb, here are some important things to check:
- Firmness and Weight: A good bulb should feel hard and heavy for its size. This means it has plenty of stored food and energy inside, which it needs to grow strong and produce flowers. If it feels soft or light, it might be dried out or unhealthy.
- Blemish-Free Appearance: Look closely at the outside of the bulb. Avoid any bulbs that have soft or mushy spots, any green or white mold growing on them, or any cuts or bruises. The outer layer should look mostly smooth and intact.
- Size Matters: Bigger bulbs usually have more energy stored in them. This often means they can produce more flower stalks and the flowers themselves might be bigger and more impressive. So, if you want lots of big blooms, try to choose the largest healthy bulbs you can find.
Lots of Colors to Choose From:
Amaryllis flowers come in many beautiful colors! You can find them in deep reds, pure whites, soft pinks, bright oranges, and even some with stripes of different colors. When you’re buying, see what colors are available in your local shops or online and pick the ones you like best. You might even find some popular colors like deep red for the holidays or elegant white for a sophisticated look.
Expert Tip: Before you pay for your amaryllis bulbs, take a close look at them. Make sure they feel firm, don’t have any damage or mold, and are a good size. This small check can make a big difference in how well your amaryllis grows and blooms!
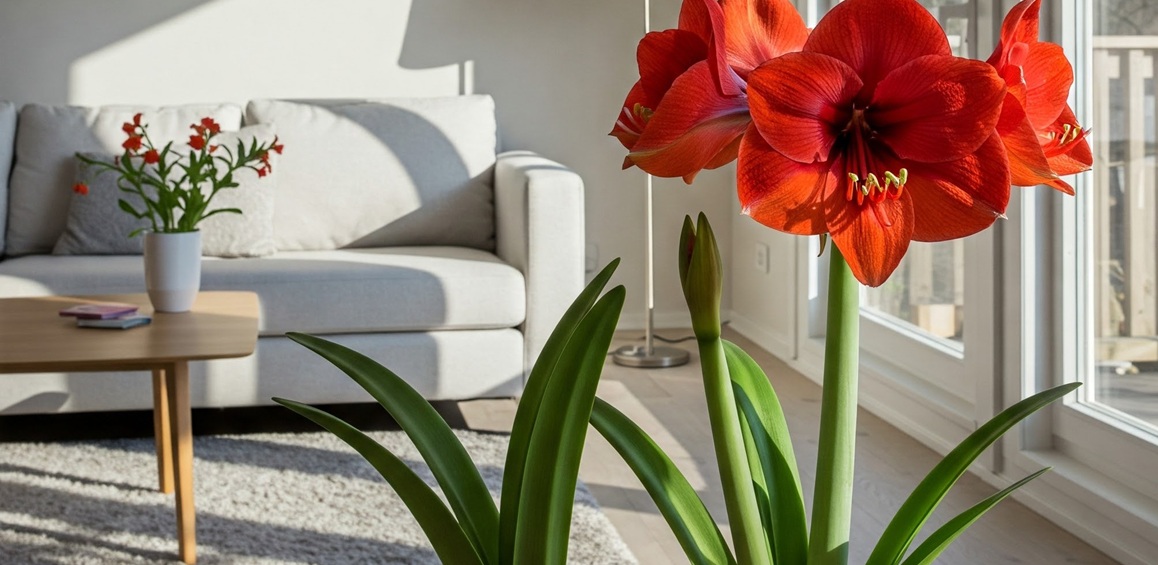
Step 2: Planting Amaryllis Indoors

Once you have your healthy amaryllis bulbs, the next step in how to grow amaryllis is planting them in pots indoors. This is a simple process that sets the stage for those gorgeous flowers.
Choosing the Right Pot:
The pot you choose for your amaryllis should be just the right size. Pick a pot that is only about 1 to 2 inches wider than the bulb itself. A snug fit is good because it helps the roots grow better and keeps the pot from holding too much water. Make sure the pot has a hole in the bottom so extra water can drain out. This is very important to prevent the bulb and roots from rotting.
Selecting the Best Soil Mix:
Amaryllis bulbs like soil that drains well. This means that when you water, the extra water can flow out easily. Here are some ideas for a good soil mix:
- Well-Draining Potting Mix: You can often buy ready-made potting mixes from nurseries or garden centers. Look for ones that say “well-draining.”
- Amending Local Soil: If you’re using soil from your garden, it’s a good idea to make it drain better. You can do this by mixing in some sand (the kind used for construction is usually okay, just rinse it if it’s very dusty) and perlite (these are little white, lightweight pieces that help with drainage and airflow). A good mix might be about two parts potting soil (or garden soil), one part sand, and one part perlite.
Why are these things important in the soil mix?
- Potting Soil (or Garden Soil): This provides the nutrients the plant needs to grow.
- Sand: Helps water drain through the soil more quickly, so the roots don’t stay too wet.
- Perlite: Also helps with drainage and creates small air pockets in the soil, which the roots need to breathe.
Step-by-Step Guide to Planting Indoors:
- Place a little soil in the bottom of your pot. Just enough to lift the bulb so that about one-third of it will be sticking out above the soil level.
- Set the amaryllis bulb on top of the soil. Make sure the pointed end (where the leaves and flower stalk will grow from) is facing up.
- Carefully fill the rest of the pot with your soil mix. Gently press the soil around the bulb so it’s snug but not too tight. Remember to leave about one-third of the bulb showing above the soil.
- Water lightly. After planting, give the soil just enough water to make it moist. Don’t soak it! You just want to encourage the roots to start growing.
Creating the Best Indoor Environment:
To help your amaryllis thrive indoors, think about these things:
- Light: Amaryllis loves bright light, but it doesn’t need direct, harsh sunlight. Place your potted bulb near a window that gets plenty of light but where the sun’s rays are filtered, like through a sheer curtain. East-facing or west-facing windows are usually good. Avoid south-facing windows during the hottest part of the day unless you have a way to diffuse the light.
- Temperature: Amaryllis grows best in a room temperature between about 18°C and 24°C (65°F to 75°F). Try to keep it away from places where the temperature changes a lot, like right next to an air conditioner or a very sunny window that gets super hot.
- Humidity: Amaryllis is usually pretty adaptable to normal indoor humidity levels. Just make sure the pot has good drainage so the soil doesn’t stay soggy.
By following these steps, you’ll give your amaryllis bulb a great start for growing beautiful flowers indoors!
Step 3: Cultivating Amaryllis Outdoors

Growing amaryllis outdoors can be successful in warmer climates. Here’s what to consider:
Suitability for Outdoor Growing:
Amaryllis thrives in warm weather and can be planted outdoors once the danger of frost has passed in your region. The ideal time for outdoor planting is typically in the spring.
Selecting the Right Outdoor Location:
- Partial to Full Sunlight: Amaryllis prefers a location that receives at least 6 hours of sunlight daily. However, in areas with very intense midday sun, providing some afternoon shade can help prevent leaf scorch and prolong the life of the flowers.
- Well-Draining Soil: Just like indoors, well-draining soil is crucial for outdoor amaryllis. Amend heavy clay soils with sand, compost, or other organic matter to improve drainage and prevent bulb rot.
Outdoor Planting Steps:
- Spacing: Plant amaryllis bulbs about 12-18 inches apart to give them enough room to grow and spread.
- Planting Depth: Plant the bulbs with the neck and top portion of the bulb (about one-third to one-half) exposed above the soil surface, similar to indoor planting.
Fertilizing Outdoors:
- Apply a balanced fertilizer in early spring as new growth emerges. You can also fertilize again after the flowering period has finished to help the bulb store energy for the next season. Slow-release granular fertilizers are a convenient option for outdoor plantings.
Seasonal Protection:
- In regions that experience heavy rainfall, ensure the planting location has excellent drainage to prevent the bulbs from sitting in water.
- In areas with very hot summers, providing some shade during the hottest part of the day can be beneficial. In regions prone to frost, amaryllis bulbs will need to be dug up in the fall and stored indoors over the winter.
Step 4: Watering and Feeding Your Amaryllis

Providing the right amount of water and nutrients at each stage of growth is key to how to grow amaryllis successfully and encouraging those stunning blooms.
Watering During Initial Growth
When you first plant your amaryllis bulb, it’s important to water it about once a week, making sure the soil becomes moist but not soaking wet. Think of it like giving the bulb a gentle wake-up call. This careful watering encourages the roots to start growing and reaching out into the soil to establish a strong foundation for the plant. If the soil stays too wet (waterlogged), the bulb can rot before it even has a chance to grow.
Watering During Flowering
Once your amaryllis starts to grow its tall flower stalk and buds begin to appear, you’ll want to adjust your watering. Now, only water when the top of the soil feels dry to the touch. Why? Because during this active blooming period, too much water can still lead to rot, especially around the bulb and developing flower stem. Letting the soil dry out slightly between waterings helps prevent this and encourages healthy flowering.
The Role of Fertilizers at Different Stages
Just like us, plants need food to grow strong and healthy. For amaryllis, the type of food (fertilizer) it needs changes a bit depending on what stage it’s in:
- Low Nitrogen in Initial Growth: When your bulb is first planted and starting to grow roots, use a fertilizer that is lower in nitrogen (the first number in the N-P-K ratio on the fertilizer label).5 Nitrogen mainly helps with leafy growth. At this stage, we want the plant to focus on building a good root system, so less nitrogen and a bit more phosphorus (the second number) is beneficial.
- High Phosphorus During Flowering: When you see the flower stalk developing and the buds forming, switch to a fertilizer that is higher in phosphorus. Phosphorus is the nutrient that helps with flower development. It supports the production of vibrant, large, and beautiful blooms.
- Balanced Fertilizer for Overall Health: After the flowers have faded, while the leaves are growing, you can use a balanced fertilizer (where the N-P-K numbers are fairly similar). This provides all the nutrients the plant needs for healthy leaf growth, which is crucial for the bulb to store energy for the next flowering season.
Dormancy Watering (Crucial for Reblooming)
After your amaryllis has finished flowering and the leaves start to turn yellow and die back, the plant is entering its resting period, called dormancy. At this stage, it’s very important to water very sparingly, almost not at all. This dry period signals to the bulb that it’s time to rest and recharge. Too much water during dormancy can lead to rot and prevent the bulb from reblooming in the next season. Think of it as letting the plant have a long, dry sleep.
Expert Tip: Pay attention to your amaryllis and the conditions around it. If the air is very humid or the temperature is cooler, the soil will stay moist longer, so you won’t need to water as often. If it’s hot and dry, you might need to water a little more frequently. Observing your plant and feeling the soil is the best way to figure out the perfect watering schedule for your amaryllis.
Step 5: Providing Optimal Light and Temperature for Amaryllis

Giving your amaryllis the right light and temperature is crucial for healthy growth and beautiful blooms. Let’s break down what your plant needs.
Indoor Lighting in Detail:
- Bright, Indirect Sunlight: Amaryllis thrives in bright light, but direct sunlight, especially during the hottest part of the day, can be too intense and can scorch the leaves. Think of the light it would get if it were growing under a thin canopy. Indoors, this means placing your potted amaryllis near a window where it receives plenty of light but isn’t directly in the sun’s rays. East-facing or west-facing windows are often ideal. You might use a sheer curtain on a south-facing window to soften the direct sunlight.
- Rotating the Pot: Plants naturally grow towards the light source. To ensure your amaryllis grows straight and doesn’t become lopsided, it’s a good idea to rotate the pot every few days. This way, all sides of the plant get even exposure to the light.
Outdoor Lighting Considerations
If you’re growing your amaryllis outdoors in a suitable climate, remember that while it loves light, it can still be sensitive to very intense, direct afternoon sun. Choose a spot that gets plenty of morning sun but offers some shade during the hottest part of the day to prevent stress on the plant.
Temperature Management
Amaryllis prefers a consistent and comfortable temperature range. Aim to keep your plant in a room where the temperature stays between 18°C and 24°C (65°F to 75°F). It’s important to avoid extreme temperature fluctuations. Keep your amaryllis away from drafty windows or doors, as well as heating vents or air conditioners, which can cause sudden changes in temperature that the plant doesn’t like. Maintaining a stable temperature helps the plant grow steadily and encourages healthy blooming.
Step 6: Supporting Amaryllis Blooms

As your amaryllis grows tall and produces those spectacular, large flowers, you might notice the stems starting to lean or even bend under the weight. Providing support will help keep your blooms upright and prevent them from breaking.
Why Support is Often Necessary
Amaryllis flowers are quite substantial, and sometimes the stems, especially on taller varieties or those with multiple blooms, can become top-heavy. This is especially true as the flowers fully open and their weight increases. Without support, the stems can bend, droop, or even snap, damaging the plant and shortening the life of the blooms.
Staking Techniques
Using stakes is a simple and effective way to support your amaryllis stems:
- Choose your stakes: You can use bamboo stakes, thin wooden dowels, or even sturdy twigs that look natural. The stake should be tall enough to support the stem up to just below the flower.
- Insert the stake carefully: Gently push the stake into the soil near the bulb and behind the flower stem. Be careful not to push the stake directly into the bulb itself, as this can cause damage. Position the stake so it will provide the most support to the leaning stem.
- Tie the stem to the stake: Use soft twine, garden string, or even a piece of fabric to loosely tie the flower stem to the stake. Make sure the tie is not too tight, as this can constrict the stem and damage it. The goal is to provide gentle support, not to bind the stem rigidly. You might need to tie the stem in one or two places along its length for better support.
Using Support Structures
If you are growing amaryllis outdoors, especially if you have multiple plants, you can consider using small trellises or placing the plants near a wall or fence that can offer some support as they grow taller. This can be particularly helpful in windy locations.
Tying Stems Securely Yet Gently
Remember that when you are tying the stems to supports, the key is to be secure enough to provide stability but gentle enough to avoid any damage. Check the ties periodically to ensure they are not too tight as the stem thickens. You want to cradle the stem, not constrict it.
Step 7: Encouraging Amaryllis to Rebloom

Getting your amaryllis to flower again in the following seasons is a pleasing part of how to grow amaryllis. With the right care after the initial blooms fade, you can enjoy these beautiful flowers year after year.
Cutting Off Spent Flowers (Energy Conservation)
Once the magnificent blooms of your amaryllis have faded and begun to wilt, it’s important to cut them off. Use a sharp knife or scissors to snip the flower stalk close to the top of the bulb, being careful not to damage any developing leaves. Removing the spent flowers prevents the plant from putting energy into producing seeds, which it doesn’t need and would take away from the energy it needs to store for future growth and blooming.
The Vital Role of Leaves (Photosynthesis and Energy Storage)
After you’ve removed the spent flowers, the long, strap-like leaves will continue to grow. These leaves are like tiny solar panels for your plant! They perform photosynthesis, which is how the plant makes its own food and stores energy in the bulb. It’s crucial to leave these leaves intact and allow them to grow throughout the spring and summer. They are essential for replenishing the bulb’s energy reserves, which will fuel the next round of beautiful flowers.
Gradually Reducing Water (Signaling Dormancy)
As the leaves start to naturally turn yellow and begin to die back towards the end of the growing season (typically late summer or early fall), this is a sign that your amaryllis is preparing for its dormant period. At this point, you should gradually reduce the amount of water you give the plant. This drier period signals to the bulb that it’s time to rest.
The Dormancy Period (Cool, Dark Storage)
Once the leaves have completely yellowed and dried, you can trim them off close to the top of the bulb. Now it’s time to give your amaryllis its well-deserved rest. Carefully remove the bulb from the soil and gently clean off any excess dirt. Store the bulb in a cool (around 13-18°C or 55-65°F), dark, and dry place for about 8 to 10 weeks. A basement, a cool garage, or even a dark corner of a closet can work. This resting period is essential for the bulb to re-initiate the flower development process for the next blooming season. Do not water the bulb during this dormancy period.
Replanting and Resuming Care (Initiating a New Cycle)
After the dormancy period, usually about 6 to 8 weeks before you want the amaryllis to bloom again, it’s time to wake it up! Repot the bulb in fresh, well-draining potting soil, using a pot that is only slightly larger than the bulb. Place the bulb in the pot as you did before, with about one-third of it above the soil line. Move the pot to a warm, sunny location and begin watering sparingly at first. Once you see new growth emerging, you can gradually increase the watering. With proper care, your amaryllis should reward you with another display of stunning blooms in a few weeks!
Expert Tip: Getting amaryllis to rebloom can sometimes be a bit tricky. Don’t be discouraged if it doesn’t happen every single year. Just continue to provide the best possible conditions – allowing the leaves to grow after flowering, providing a proper dormancy period, and resuming care at the right time – and hope for the best!
Common Amaryllis Growing Issues
Even with the best care, you might encounter some challenges when you grow amaryllis. Here are some common problems and what might be causing them:
Lack of Blooms (Despite Leaves): If your amaryllis is producing healthy leaves but no flowers, several factors could be at play:
- Insufficient Light: Amaryllis needs bright, indirect light to build up enough energy to flower. Make sure it’s in a well-lit spot.
- Improper Dormancy: The bulb needs a proper cool, dark dormancy period to trigger reblooming. If this rest was too short or not cool enough, it might not flower.
- Nutrient Deficiencies (especially phosphorus): A lack of phosphorus can hinder flower development. Ensure you’re using a fertilizer higher in phosphorus during the blooming season.
- Overwatering: While the plant needs moisture, consistently soggy soil can stress the bulb and prevent flowering.
- Immature Bulb: Very small or young bulbs might not have enough stored energy to flower yet.
Yellowing Leaves: Yellowing leaves can indicate a few different issues:
- Overwatering: This is a common cause of yellowing leaves, as it can lead to root rot.
- Underwatering: If the soil gets too dry for extended periods, the leaves might start to yellow.
- Nutrient Issues: Both a lack of nutrients or an excess of certain nutrients can cause leaf discoloration.
- Natural Dormancy: As the plant prepares for its dormant period, the leaves will naturally turn yellow and die back. This is normal at the end of the growing season.
Soft or Rotting Bulb: A soft or mushy bulb is a serious problem, usually caused by:
- Overwatering: When the bulb sits in constantly wet soil, it can begin to rot
- Poor Drainage: If the pot doesn’t have drainage holes or the soil doesn’t drain well, excess water can accumulate around the bulb.
Weak or Leggy Stems: Tall, thin, and weak flower stems that tend to flop over are often a sign of:
- Insufficient Light: The plant stretches towards the light, resulting in weak growth.
- Temperature Fluctuations: Significant temperature changes can stress the plant and lead to weaker stems.
Pests and Diseases: While amaryllis are generally quite resilient, they can occasionally encounter pests or diseases
- Pests: Keep an eye out for common houseplant pests like aphids or spider mites. If you notice any, you can try wiping them off with a damp cloth or using an insecticidal soap according to the product instructions.
- Diseases: Fungal diseases can sometimes occur, especially in overly humid conditions or with poor air circulation. Ensure good drainage and avoid overwatering to help prevent these issues. If you suspect a fungal disease, you might consider using a fungicide labeled for houseplants, following the product directions carefully.
Frequently Asked Questions
Q. How long does it typically take for an amaryllis to bloom after planting?
Amaryllis bulbs usually take about 6 to 8 weeks to bloom after planting. However, this can vary slightly depending on factors like the specific variety, the size and health of the bulb, and the environmental conditions (light, temperature). Some varieties might bloom a bit faster or slower.
Q. Can amaryllis be grown hydroponically (in water)?
Yes, amaryllis can be grown hydroponically in water. This involves placing the bulb in a container with water just touching its base, allowing the roots to grow into the water while keeping the bulb itself dry.
Q. Why are my amaryllis leaves growing excessively with no flowers?
If your amaryllis is producing lots of leaves but no flowers, it could be due to a few reasons:
- Insufficient Light: The plant might not be getting enough bright, indirect sunlight to build up the energy needed for flowering.
- Improper Dormancy: The bulb might not have had a sufficiently cool and dark dormancy period, which is crucial for triggering flower development.
- Nutrient Imbalance: There might be too much nitrogen in your fertilizer, which encourages leafy growth at the expense of blooms. A fertilizer higher in phosphorus is needed for flowering.
- Overwatering: Consistently soggy soil can stress the bulb and prevent it from flowering.
- Immature Bulb: A very young or small bulb might focus on leaf growth before it’s mature enough to flower.
Q. What is the best way to store amaryllis bulbs for reblooming?
After the leaves have died back naturally, carefully remove the bulb from the soil and gently clean off any excess dirt. Store the bulb in a cool (around 13-18°C or 55-65°F), dark, and dry place for about 8 to 10 weeks. Good options include a basement, a cool garage, or a dark closet. Ensure good air circulation to prevent mold. Do not water the bulb during this dormancy period.
Q. Can amaryllis be planted directly in the garden year-round?
What are the considerations? In regions with mild climates where temperatures do not drop below freezing for extended periods, amaryllis can sometimes be planted directly in the garden year-round.
Q. Do amaryllis bulbs naturally rebloom every year? What helps?
Yes, amaryllis bulbs can rebloom every year if they are given the proper care. The key factors that help amaryllis rebloom are:
- Allowing the leaves to grow and photosynthesize after the initial blooms fade to replenish the bulb’s energy stores.
- Providing a distinct cool, dark, and dry dormancy period.
- Resuming watering and providing bright light after the dormancy period to initiate new growth and flowering.
- Using a fertilizer higher in phosphorus during the blooming season.
Q. What should I do with the amaryllis bulb after it has finished blooming completely?
After the flowers fade, cut off the flower stalk close to the top of the bulb. Continue to water the plant when the top inch of soil feels dry and fertilize regularly with a balanced fertilizer to encourage leaf growth and energy storage in the bulb. Once the leaves start to turn yellow and die back naturally, gradually reduce watering and allow the plant to enter its dormancy period. Then, follow the steps for storing the bulb for reblooming.
Q. Does amaryllis prefer sun or shade?
Amaryllis prefers bright, indirect sunlight. While it needs plenty of light to thrive and bloom, direct, harsh sunlight can scorch its leaves. A spot near a window that receives bright light but is shielded from the most intense rays is ideal.
Conclusion: The Enduring Allure of Homegrown Amaryllis
There is a unique joy in witnessing the magnificent blooms of an amaryllis that you have nurtured yourself. The vibrant colors and impressive size of the flowers bring a touch of wonder to any space, making the effort of growing them truly rewarding.
To successfully grow amaryllis and enjoy its beauty, remember these key factors:
- Begin by selecting healthy, premium bulbs.
- Plant them correctly, whether you choose to grow them indoors in pots or outdoors in a suitable climate.
- Provide balanced care, paying attention to their specific needs for watering, feeding, light, and temperature at each stage of growth.
- Support the tall, heavy blooms to prevent damage and keep them looking their best.
- Understand and respect the importance of the dormancy period to encourage reliable reblooming year after year.
Pay close attention to your amaryllis plants. Observe how they respond to their environment and adjust your care routine as needed.
With a little dedication and by following these guidelines, you can look forward to the spectacular display of homegrown amaryllis blooms gracing your home or garden season after season.
Recommended Products:

I’m John Doe, a Certified Master Gardener with over 20 years of hands-on experience in cultivating healthy and vibrant gardens. My expertise spans organic gardening, soil science, and sustainable pest control. I’ve worked extensively with community gardens and have a deep passion for sharing my knowledge to help others succeed in their gardening endeavors.


